PREVIOUS ARTICLENEXT ARTICLE
FEATURE ARTICLES
Vignetting in Photoshop
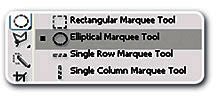
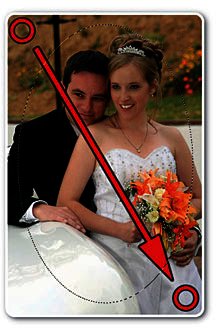
By z 5 August 2009 | Categories: feature articlesThis month our Photoshop Teacher shows you how to do Vignetting and Softening. Vignetting is used to make a photograph appear softer and to be a little bit less harsh on the eyes. It is often used in wedding photography or to accentuate certain elements on a photo. Once again, we will take a Noob friendly approach on this task.
Good luck playing, and if at first you do not succeed, try again! Click here to download the picture used in this tutorial. |

USER COMMENTS
Most Read Articles
Read
Magazine Online

TechSmart.co.za is South Africa's leading magazine for tech product reviews, tech news, videos, tech specs and gadgets.
Start reading now >
Download latest issue
Have Your Say
What new tech or developments are you most anticipating this year?
New smartphone announcements (46 votes)
Technological breakthroughs (29 votes)
Launch of new consoles, or notebooks (14 votes)
Innovative Artificial Intelligence solutions (29 votes)
Biotechnology or medical advancements (25 votes)
Better business applications (160 votes)