PREVIOUS ARTICLENEXT ARTICLE
THE DIY DUDE
By 14 April 2010 | Categories: the diy dude

0


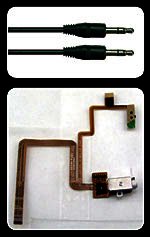
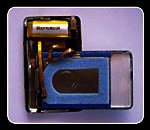
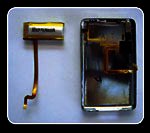
We’ll be showing you how to fix an earphone plug, and then replace an iPod Video earphone jack and battery (but it should work for most of the other iPods too).

You can get a matching plug from any electronics store. An earphone jack and battery will set you back about R600 for both, still cheaper than buying a new one.

To find the replacement part you’re looking for have a look at either www.ifixipods.co.za or www.igear.co.za. For the less adventurous both sites offer a repair service if you’re willing to mail your iPod to far far away for a couple of days.

You’ll need the following

• A blunt knife or plastic object to pry the case open.
• A small screw driver set, pliers and a tweezer.
• A soldering iron and small blade.

Fixing the earphone plug

We’ll be fixing the earphones first. Determine where your cable is broken by playing some music and jiggling the cable at different locations until you hear the music playing, cut the cable at about an inch away from this spot up the cable.

Stripping a centimeter of plastic from the cord will expose two really tiny wires, these are normally enamel coated. Solder one wire to each of the earphone plug connectors, you might need a bit of heat to get through the enamel coating so be patient, cramp the plug around the cable and close it up.

Opening the iPod

To open your iPod insert the knife between the top and bottom covers starting at the lower corners, work your way up wedging the two apart. Be carefull not to let the knife extend too far into the device or hurt your casing. Congratulations on now voiding your warranty. Carefully take the covers apart noting that two wires hold them together, use the tweezer to disconnect the latches holding the wires in place on the main board. You can now completely detach the back cover.

Replace

Pry the battery off with the knife being careful not to damage the ribbon cable attaching the earphone plug. Unscrew the old earphone jack and replace it with the new one, replace the battery and make sure the glue strip is holding it in place.

Closing everything up is a bit tricky, the ribbon connectors on the main board have a little brown latch that you need to open, insert the cables and push the hinges shut ensuring that they’re making contact by pulling on the cables slightly.

Close the covers by snapping them into place and you’re ready to go. [MS]


Replacement
headphone jack


Back cover attached


Back cover semi
attached


Back cover
and battery

TAGS: 

USER COMMENTS

Read
Magazine Online
TechSmart.co.za is South Africa's leading magazine for tech product reviews, tech news, videos, tech specs and gadgets.
Start reading now >
Download latest issue

Have Your Say


What new tech or developments are you most anticipating this year?
New smartphone announcements (44 votes)
Technological breakthroughs (28 votes)
Launch of new consoles, or notebooks (14 votes)
Innovative Artificial Intelligence solutions (28 votes)
Biotechnology or medical advancements (21 votes)
Better business applications (132 votes)