PREVIOUS ARTICLENEXT ARTICLE
FEATURE ARTICLES
By 11 September 2009 | Categories: feature articles


  1. First, select the photograph which you want to use to create your profile picture.
  2. Now, select the Crop Tool from the tools palette, and apply the following settings in the top options bar.
  3. Setting the width to 200 pixels and the height to 300 pixels before cropping will allow your final crop to be exactly 200 by 300 pixels (remember to type in “px” after the numbers), the correct size for Facebook meaning that we won’t have to resize afterwards. If you want a landscape image, type in 200px by 134px
  4. Now, drag a frame around your face inside the image. You will notice a selection (marching ants) and corner control points at the edges of the box. You will also notice that the area outside the box will be shaded. The area inside the box is what will remain after cropping.
  5. You can now easily drag the corner points around so as to resize the area that will be cropped. You can even rotate the cropping box if you want to (the final result will be straightened). Also note that the cropping frame will be constrained to a 2:3 ratio due to the values we types in earlier.
  6. Once you are happy with your cropping selection, press [ENTER], and the image will be cropped.
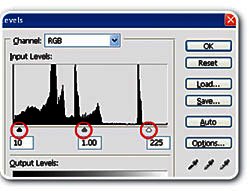
  7. Next you may want to enhance the colour of your image just a bit. Press CTRL + L to open the Levels Editor.
  8. Below the histogram (the thingy that looks like a mountain range) you will notice three sliders. Move the left slider a bit to the right, the right slider a bit to the left, and the middle one to either side. Play around with these, as the values change for each image. “Hugging” the levels like this usually enhances the colours just a bit. When you are happy, click OK.
  9. Lastly, we want to apply some sharpening before we save. Select Filter > Sharpen > Unsharp Mask. Apply the following values for a start:
    • Amount: 110%
    • Radius: 0.9 pixels
    • Threshold: 3 levels
  10. Once again, play around with the values. Amount you can play with a lot, but keep Radius to the lower ­spectrum. Threshold is usually best left between 1 and 5. (There are much better sharpening techniques, but this is the easiest one). Have a look at your preview window to see the result of your values. Make sure that the Preview tab is on.
  11. Once you are happy, and have clicked on OK, we can save the image.
  12. Select File > Save As. Make sure that you do not save over your original image! Give your file a name, and select JPEG from the Format drop-down (about 7th from the top), and click on Save.
  13. On the next popup, select Quality = 7. You do not really need quality of 12. On 7 most people will not notice the quality loss, and you save a lot of upload time. Also select Baseline Optimized from the format option, and click OK.

Please let us know what you would like to learn to do in Photoshop by emailing info@techsmart.co.za. For easy to follow Photoshop courses call Teach Me Photoshop on 084-88-000-55 or visit www.teachmephotoshop.co.za.

USER COMMENTS

Read
Magazine Online
TechSmart.co.za is South Africa's leading magazine for tech product reviews, tech news, videos, tech specs and gadgets.
Start reading now >
Download latest issue

Have Your Say


What new tech or developments are you most anticipating this year?
New smartphone announcements (44 votes)
Technological breakthroughs (28 votes)
Launch of new consoles, or notebooks (14 votes)
Innovative Artificial Intelligence solutions (28 votes)
Biotechnology or medical advancements (21 votes)
Better business applications (132 votes)